When it comes to the essential task of brake maintenance, a quality brake job goes far beyond just swapping out the pads. Professional technicians follow specific steps to ensure your brakes function smoothly and safely. Here, we’ll explore what a comprehensive DIY brake job entails, focusing on techniques and tips that can replicate professional results right in your driveway.
Importance of a Quality Brake Job

Why a Quality Brake Job is More Than Just Replacing Pads
Brakes are a critical component of vehicle safety, and doing a proper brake job is crucial. While many people think that a brake job just involves changing the pads, there are several other steps that professionals take to ensure a long-lasting and effective braking system.
Overview of Professional Techniques
A professional brake job includes lubricating caliper slides, cleaning essential components, and ensuring everything is in peak working order. These steps are vital for preventing issues such as uneven wear or caliper sticking, which could compromise your vehicle’s braking performance.
Basic Brake Components
Description of Calipers
Calipers are integral to your vehicle’s braking system. They come in two primary types: floating calipers and sliding calipers.
Floating Caliper
A floating caliper moves on pins and shifts side to side whenever you apply the brakes. This movement ensures that the brake pads contact the rotor evenly.
Sliding Caliper
A sliding caliper, on the other hand, moves along support keys. When you apply the brakes, this caliper slides back and forth to push the pads against the rotor, achieving the same goal of even contact.
Overview of Brake Pads and Rotors
Brake pads press against the rotors to create friction, which slows down the vehicle. Over time, pads wear down and require replacement, but rotors also need regular inspection for any signs of damage or excessive wear.

Lubricating Caliper Slides
Importance of Lubrication
Lubrication is crucial for the smooth operation of calipers, enabling them to move freely. Lack of lubrication can lead to caliper sticking, uneven pad wear, and compromised braking effectiveness.
Benefits:
- Reduces friction
- Prevents rust and corrosion
- Ensures smooth caliper movement
Potential Problems from Lack of Lubrication:
- Sticking calipers
- Uneven pad wear
- Reduced braking performance
Tools Needed for Lubrication
Ensure you have the following tools before starting your DIY brake job:
- Brake cleaner
- High-quality lube
- Wire wheel (optional for deep cleaning)
Types of Calipers

Floating Calipers
Description of Floating Calipers
Floating calipers operate on pins, allowing them to float and engage the brake pads evenly against the rotors.
Process of How They Move
When you hit the brakes, the floating caliper moves on its pins, ensuring that the outboard pad contacts the rotor effectively.
Sliding Calipers
Description of Sliding Calipers
Sliding calipers work differently by sliding along support keys.
Process of How They Slide
This movement pulls and pushes the pads against the rotor evenly. Proper lubrication ensures this sliding motion remains unhindered.
Importance of Keeping Brakes Clean
Why Clean Brakes Matter
Clean brakes are critical for safe and effective braking. Dust, grime, or rust can impede performance and lead to unnecessary wear and tear.
Products for Cleaning Brakes
Overview of Brake Cleaner
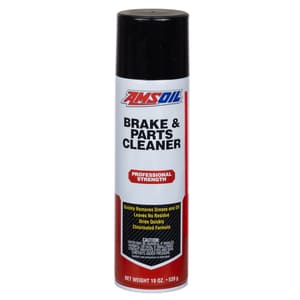
A high-quality brake cleaner is essential for removing debris and old grease. AMSOIL Brake and Parts Cleaner offers high solvency to cut through grime and comes in a high-pressure can for an impactful spray. It dries quickly, allowing you to proceed with lubrication without delay.
Demonstration of Cleaning and Lubrication Process
Step-by-Step Cleaning Guide
Preparing the Caliper: Remove the brake components to access the caliper.
Using Brake Cleaner: Apply brake cleaner evenly across the caliper. Use the high-pressure can for thorough cleaning.
Wiping and Drying the Caliper: After spraying, wipe the caliper clean. Ensure it’s thoroughly dry before applying lube.
Optional Wire Wheel Use: For stubborn grime, consider using a wire wheel to achieve a clean surface.
Step-by-Step Lubrication Guide
Application of Lube: Apply lubricant to the caliper slides or pins. Use enough to cover the area thoroughly but avoid over-application to prevent dripping.
Ensuring Even Distribution: Move the caliper to ensure the lube spreads evenly across the sliding surfaces.
Reassembling the Caliper: Once lubricated, reassemble the caliper and brake components, ensuring everything fits and moves properly.
Importance of a Square Cut Seal
Function of a Square Cut Seal
The square cut seal, located in the piston, plays a vital role by slightly distorting to pull the brake pads away from the rotor when you release the brake pedal. This small movement is crucial for brake efficiency.
Visual Aid
Imagine a small seal distorting just enough to retract the pads. Understanding this mechanism highlights the importance of keeping all components clean and well-lubricated.
Tips for DIY Brake Jobs
Tools and Products Needed
- Brake cleaner
- High-quality lube
- High-pressure can
- Basic brake tools (wrenches, jacks, etc.)
- Wire wheel (optional)
Safety Precautions
- Wear safety goggles and gloves.
- Use jacks and jack stands to safely lift the vehicle.
- Handle brake cleaner and lube carefully to avoid skin and eye contact.
Maintenance Tips
- Regularly inspect brake pads and rotors.
- Clean and lubricate calipers during each brake job.
- Watch for signs of wear, such as noise or reduced braking performance, and address them promptly.
Recommended Products
AMSOIL Brake and Parts Cleaner
AMSOIL Brake and Parts Cleaner is a top choice for its effectiveness. It offers high solvency to break down grease and grime, and its high-pressure can ensures thorough application. Quick drying allows you to move to the lubrication stage without waiting.
Detailed Steps for Using Brake Cleaner
Precautions
- Use in a well-ventilated area.
- Wear protective gear.
- Avoid spraying near open flames.
Application Process
- Hold the can 6-12 inches from the surface.
- Spray evenly to cover all areas.
- Wipe off any excess cleaner and allow to dry.
Drying
Brake cleaner typically dries within minutes. Ensure the area is completely dry before applying lube to avoid reducing the lubricant’s effectiveness.
Detailed Steps for Lubricating Caliper Slides

Preparing the Slide Pins
- Clean and inspect the slide pins for any signs of wear or damage.
- Replace pins if necessary.
Applying Lubricant
- Apply a small amount of lube to the pins or sliding surfaces.
- Ensure the lubricant is evenly distributed.
Reassembly Tips
- Carefully reassemble the caliper components.
- Check for proper fit and movement to ensure everything is working correctly.
Troubleshooting Common Issues
Sticky Calipers
Causes:
- Lack of lubrication.
- Contaminated slide pins.
Solutions:
- Clean the caliper thoroughly.
- Reapply lubricant and reassemble.
Uneven Brake Wear
Diagnosing the Problem:
- Inspect the brake pads for uneven wear patterns.
- Check for caliper sticking or improper installation.
Preventative Measures:
- Regular inspection and maintenance.
- Proper lubrication of caliper slides.
Importance of Professional Brake Jobs

Advantages of Professional Services
While a well-executed DIY brake job can match professional standards, there are situations where professional services might be beneficial.
Expertise and Equipment: Professionals have specialized tools and extensive experience.
Quality Assurance: Professional services come with guarantees and warranties, offering peace of mind.
Conclusion
In summary, a successful DIY brake job requires more than just replacing brake pads. Proper cleaning, lubrication, and understanding of brake components are essential for optimal performance and safety.

